3.31.2017

T-Shirt to Dress Refashion with Scalloped Hem


It's refashion time again! I started off with this striped tee. It is super soft and comfortable, but the sleeves were too bulky and the length was too long for my taste. I took off the sleeves, but I saved them for a later project. I always save the pieces that I don't use for later use. You never know what you might end up with! I decided to make a dress out of this tee, and I wanted to incorporate some scallops. I went for a little pattern mixing with the stripes and the texture of the "jegging" fabric. I admit, I went to fashion school, and I still call this fabric "jegging" fabric, haha. :)

STEPS

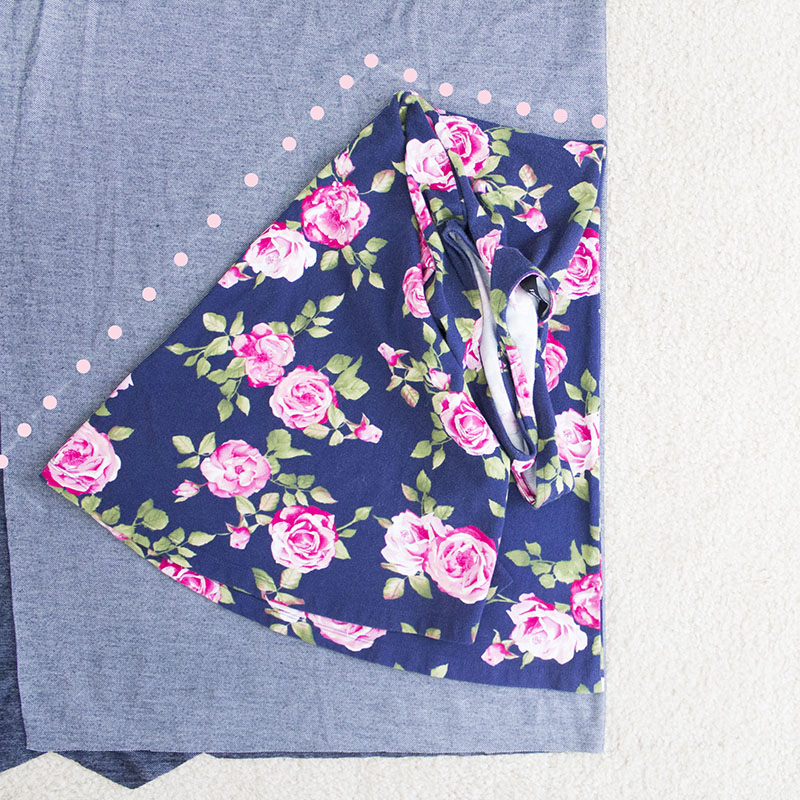
1. To make my skirt piece, I used an existing dress because I like how it draped. I traced all around and left some room for seam allowance.


Just like this:


2. Since I wanted my skirt piece to be a bit longer, I had to measure from the top to the bottom. I wanted it to be 21".


3. I measured 21" from the top to the bottom, and I made marks, so it would be a nice even curve.


4. I cut two of these pieces so my dress would drape nicely. 
(Perfect for twirling around!)


5. Next, I sewed down both sides of the new skirt piece.


6. To make the scallops, I used a cup and traced around the skirt.


Like this:


7. Here is how the skirt piece looked like after I cut the scallops. Since I used a jersey knit, I left them as is, since they won't fray.


8. Now on to the sleeves! I chopped both sleeves off.


9. Before I attached the new sleeves on, I wanted to add some lace to the sides. Since the tee is stretchy, I put it on my mannequin and pinned the lace on. Then, I carefully took it off my mannequin and sewed it.


10. Then, I cut off excess fabric from the tee shirt.


11. To make the new sleeves, I traced them as shown below. (the pink dots)


This is how they look like once they're cut out.


12. Next, with the new sleeve inside out (right sides of the fabric touching together), I sewed down the side. (the pink dots)


13. To attach the new sleeve, I placed the sleeve inside the armhole (right sides of the fabrics touching), and sewed along the armhole. (pink dots) The mint dots represent the new sleeve on the inside of the tee.


New sleeve!


14. The last step was to sew the skirt piece to the tee shirt. Right sides of the fabrics touching, and wrong sides out. This was a basting stitch, since I sewed elastic in the next step.


15. Then, it was time for elastic! I sewed it on top of the basting stitch.


16. The last step was to add binding to the sleeves as shown:

1. I took a 1 1/2" x 10" strip. (You can always cut it later, it's better to start off with too much, than too little.
2. I ironed the top part down.
3. Then the bottom part.
4. Next, I ironed that in half.
5. I sewed the strip closed.
After that, I just pinned it on the sleeve ending and sewed along the edge.


Dress refashion done!


3.27.2017

2017 Scrap Busting Craft Challenge: How to Make a Fabric Scrap Wreath Using a Wire Hanger


For this month's Craft Challenge, I wanted to "refashion" something different. I'm always refashioning clothing, so I thought I would spice it up around here a bit. :) For this month's stash busting material, I decided to use... metal hangers! A little different than what I usually do around here, right? I have tons of these hangers, and I've even thrown away a bunch of them. I don't like to hang my clothes on them, because they don't hang right and I don't like how they look hehe. As I was searching Pinterest for inspiration (seems to be my number one source of inspiration these days, lol), I came across a lot of different wreaths. They all used a foam circular tube type thing, but I didn't have one, so I decided to get crafty.


STEPS

1. I bent the hanger into a circle (or I tried, haha). I also bent a little loop at the top so I can hang the wreath.


2. Since the hanger wire is too thin for a wreath, I had to sew something onto it so it would be thicker. I used an old hem band that I cut off from a hoodie. I pinned it all around, and then sewed it. For the first edge, I hand sewed it, then I sewed the rest. 


This is how it looked like after I sewed it on.


4. Next, my favorite part! I chose different fabric scraps to cut and tie around the wreath. I cut strips that were about 2.5" - 3" wide and 8" long.


5. Then, I began to tie all the fabric scraps. I tied them a little loosely, so they would fill in the wreath more.


This is how it looked after I tied all my fabric scraps.


6. Afterwards, I covered the metal part of the hanger still showing. I used a 1" wide long piece of pink jersey. I just wrapped it around until the metal was all covered and then tied some knots, so the fabric wouldn't come off.


7. For the finishing touches I made a bow and some rosettes, and hot glued them to the wreath.


TA DA!

Check out the other projects from the participants of the 2017 Scrap Busting Craft Challenge:


3.23.2017

Spring Florals & Pink Lace // Style Diary


It's Spring! I cannot believe how fast the month of March flew by. I feel that as we grow older, time passes by faster. Or at least, it feels that way. I remember back when I was a kid, a year seemed like FOREVER. Now, it's not long enough! Anyway, this is my absolute favorite time of the year. 

Here are my reasons why: 
1. It's a nice warm outside (not winter cold nor summer hot).
2. The sun is shining.
3. My birthday! HA, lol. :P

Okay, that last one is a joke, hehe. Even if my birthday didn't fall during springtime, it would still be my favorite season. Florals are my favorite print, and when I saw this dress at Nordstrom Rack, I immediately grabbed it. I paired it with this lovely lace kimono I had sitting in my closet for the longest time ever. (I really need to break that bad habit haha). Next time, I want to pair this dress with a lace skirt extender. 

//

Dress: Nordstrom Rack
Kimono: Heavenly Couture
Flower Crown: Claire's
Jewelry: Gifted
Shoes: WSS Shoes

//


Blog Design by Get Polished